Skip to content

Replenishment Overview

Replenishment is the process of ordering and receiving inventory from your suppliers to maintain adequate stock levels in your warehouse. The Replenishment module in ShipEdge Core allows you to create replenishment requests, track incoming shipments, and process merchandise receipt efficiently.

Each replenishment (also called Request or Purchase Order) represents an inventory shipment you expect to receive from a supplier or distribution center.

Catalog Overview

Maintains Stock Levels

Ensure you always have sufficient inventory to complete customer orders without interruptions.

Tracks Incoming Shipments

Monitor all shipments in transit from suppliers with expected arrival dates and tracking numbers.

Processes Receipts Efficiently

Receive and verify incoming merchandise, automatically update inventory, and place products in warehouse locations.

Complete History

Maintain detailed records of all purchase orders, quantities requested vs received, and receipt dates.

A replenishment goes through several statuses during its lifecycle:

The replenishment has been created but information is not yet complete or all necessary SKUs have not been added.

The supplier has shipped the merchandise and it’s on its way to your warehouse. The shipment has not yet arrived at your facility. This status is automatically set when the replenishment is marked as shipped but hasn’t been received yet.

The merchandise has been shipped and is currently being processed in your warehouse. This status indicates that the replenishment is actively being received and inventory is being updated.

The shipment has physically arrived at your warehouse and is ready to be received and processed in the system.

The replenishment has been partially received and requires review before marking it as completely processed.

The replenishment is currently being processed by the system or another user. This temporary status prevents concurrent modifications. The system will automatically clear this status after processing completes.

Some items from the replenishment have been received and processed, but others are still pending receipt.

All items from the replenishment have been completely received and inventory has been updated in the system.

The replenishment has been archived and no longer appears in the main list of active replenishments.

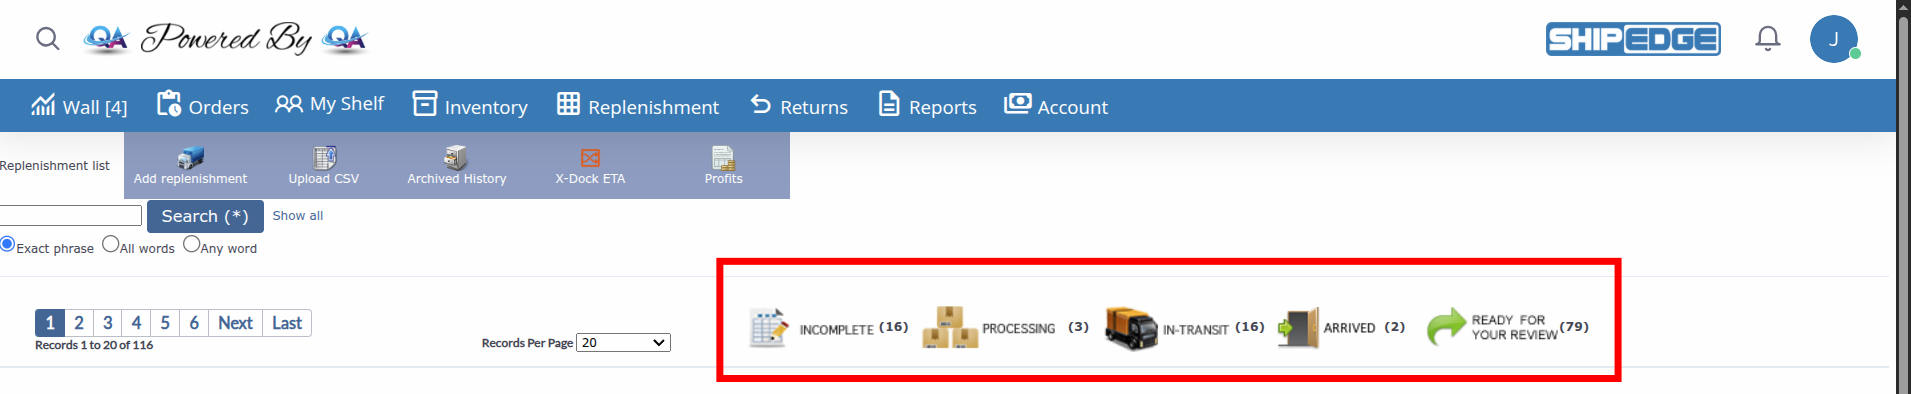
The replenishments list displays all active replenishment requests that haven’t been archived. This view allows you to manage, search, and track your incoming inventory shipments.

  1. Access the Replenishment Module

    From the main menu, navigate to Replenishment to open the replenishments list.

  2. Review the Replenishments List Table

    The table displays all active replenishments with the following columns:

    • : Sequential number in the list
    • RepleID: Unique replenishment ID (clickable to view details)
    • PO#: Purchase Order number
    • Supplier Name: Name of the supplier or inventory source
    • Tracking#: Shipment tracking number from carrier
    • Status: Current replenishment status (displayed as status icons or text)
    • Comment: Additional notes or comments about the replenishment
    • BOE: Bill of Entry number (for international shipments)
    • BL Number: Bill of Lading number (for sea shipments)
    • Container #: Container number (for containerized cargo)
    • Expected Delivery Date: Expected arrival date at your warehouse
    • Date Request: Date when the replenishment was created
    • Qty pre-sync: Indicator showing if inventory will sync to channels immediately upon submission
  3. Search and Filter Replenishments

    Use the search bar at the top to find specific replenishments:

    • Basic Search: Enter keywords and click “Search (*)”
    • Search Options: Choose search type:
      • Exact phrase: Matches the exact text entered
      • All words: All search terms must be present
      • Any word: At least one search term must match
    • Show all: Click to clear search filters and display all records
  4. Navigate and Paginate

    Use pagination controls to navigate through multiple pages:

    • First/Previous/Next/Last: Navigate between pages
    • Records Per Page: Select how many records to display (10, 20, 50, 100, 200, 500, or All Records)
  5. Sort Columns

    Click any column header to sort the list:

    • First click: Sort ascending (↑)
    • Second click: Sort descending (↓)
    • Sortable columns include: RequestID, Supplier Name, PO#, Tracking#, Status, Expected Delivery Date, Date Request
  6. Actions Available for Each Replenishment

    Click the action menu (three dots) next to each replenishment to access:

    • Inline Edit: Edit replenishment details directly in the list (for INCOMPLETE or IN-TRANSIT status)
    • View: Open detailed view to see all SKUs and quantities
    • Transfer: Transfer replenishment to another location (if enabled)
    • Archive: Move replenishment to archived history (for READY FOR YOUR REVIEW status)
    • Submit Remaining: Create a new replenishment with remaining unreceived items (for READY FOR YOUR REVIEW status)
    • Delete: Remove replenishment (only for INCOMPLETE, IN-TRANSIT, or ARRIVED status)
  7. Quick Actions

    Additional quick actions available:

    • Click the number of the RepleID to open the detailed view and add/edit SKUs
    • Use inline editing to update status, expected delivery date, or comments directly in the list
    • Export data using the export options if available

Create a new replenishment request to track incoming inventory from suppliers. The creation form allows you to enter basic shipment information before adding specific products.

  1. Access the Creation Form

    From the replenishments list page, navigate to create a new replenishment, click on Add Replenishment button to create a new replenishment.

  2. Complete Basic Information

    Fill in the following fields in the creation form:

    Supplier Name (Required):

    • Enter the name of the supplier or distributor
    • This identifies who is sending the inventory

    PO# (Purchase Order Number):

    • Enter your internal purchase order number
    • Helps correlate with your purchasing and accounting systems
    • Optional but recommended for tracking

    Tracking# (Tracking Number):

    • Enter the carrier tracking number (FedEx, UPS, DHL, etc.)
    • Allows tracking the shipment while in transit

    Comments:

    • Add any additional notes or special instructions

    BOE (Bill of Entry):

    • Enter customs declaration number for international shipments
    • Used for import tracking and customs clearance
    • Optional field, typically used for cross-border shipments

    BL Number (Bill of Lading):

    • Enter the bill of lading number
    • Required for international sea freight shipments
    • Optional field, used primarily for ocean freight

    Container # (Container Number):

    • Enter the shipping container number
    • Optional field, helpful for tracking containerized freight

    Expected Delivery Date:

    • Select the date you expect the shipment to arrive at your warehouse
    • Click the calendar icon to open the date picker
    • Format: YYYY/MM/DD (year/month/day)

    Qty pre-sync:

    • Check the box labeled “Inventory added to channels as soon as submitted”
    • When checked: Inventory syncs to your sales channels immediately when the replenishment is submitted
    • When unchecked: Inventory syncs during normal scheduled sync cycles
    • Useful for urgent inventory updates or time-sensitive products
  3. Save the Replenishment

    Click the Add button to create the replenishment.

    The system will create the replenishment with INCOMPLETE status.

  4. Add SKUs to the Replenishment

    After saving, you’ll be redirected to the details page where you can add the SKUs you expect to receive.

Once the replenishment is created, you must specify which products and quantities you expect to receive.

  1. Access Replenishment Details

    From the replenishments list, click the number of RepleID to open details. Only status (INCOMPLETE or IN-TRANSIT)

  2. Add SKUs Individually

    In the items section:

    • Enter or search for the product SKU
    • Specify the Quantity you expect to receive
    • Click the Insert button to add the SKU to the replenishment
  3. Review SKU Information

    For each SKU added, the system shows:

    • SKU: Product code
    • Description: Product description
    • Qty (units): Expected quantity
    • Cost Unit: Unit cost of the product
    • Sub-total: Total cost of the product
    • Qty Received: Received quantity (initially 0)
    • Lot#: Lot number
    • Expiration Date: Expiration date
    • Weight: Product weight
  4. Add Multiple SKUs

    Repeat the process for each product you expect in the shipment.

  5. Save Changes

    SKUs are automatically added to the replenishment.

The replenishment status changes automatically through the workflow as you complete different actions. You don’t manually edit the status directly - it updates based on your actions in the system.

Replenishment Status Flow

  1. INCOMPLETE → IN-TRANSIT

    After adding SKUs to your replenishment:

    • Go to the replenishment details page.
    • Review all SKUs and quantities
    • Click the SubmitReplenishment button
    • The status automatically changes to IN-TRANSIT when you submit the replenishment
    • This indicates the replenishment is ready and the supplier can ship
  2. IN-TRANSIT → ARRIVED

    When the shipment physically arrives at your warehouse:

    • Open the replenishment details page
    • Update it through the replenishment details page
    • This marks that the shipment is at your facility and ready to be received
  3. ARRIVED → PROCESSING

    When you begin receiving merchandise:

    • Open the replenishment in the receiving view
    • Start entering received quantities and assigning bins
    • The status automatically changes to PROCESSING when you begin the receipt process
    • This happens automatically since Warehouse Management - no manual status change needed
  4. PROCESSING → READY FOR YOUR REVIEW or PROCESSED

    After completing the receipt:

    • If all items were received completely → Status changes to PROCESSED
    • If some items are still pending → Status changes to READY FOR YOUR REVIEW
    • These status changes happen automatically since Warehouse Management based on received quantities

While you can’t directly edit the status field, you can update other information:

  • Expected Delivery Date: Update using inline editing in the list view
  • Tracking Number: Add or update tracking information
  • Comments: Add notes about the shipment or any issues
  • Supplier Name, PO#: Update basic information if needed

If you don’t receive all expected merchandise at once, the system allows partial receipts.

  • Supplier ships the order in multiple deliveries
  • Some units arrive damaged and cannot be received
  • Backorders completed in separate shipments
  • Inventory divided across multiple warehouses
  1. Receive units that arrived in the first delivery
  2. The system marks the replenishment as READY FOR YOUR REVIEW if items are still pending
  3. Pending quantities remain recorded in the system
  4. When the rest arrives, process the second receipt for remaining items
  5. The replenishment is marked as PROCESSED when everything is complete and automatically archived

Create Replenishments Proactively

Don’t wait until you run out of stock. Create replenishments when your inventory levels reach reorder point.

Use Consistent PO Numbers

Maintain a consistent numbering system for Purchase Orders. Facilitates search and cross-reference with accounting systems.

Verify Quantities Physically

Always physically count received merchandise before entering it into the system. Discrepancies should be documented in comments.

Specify Realistic Delivery Dates

Use accurate expected delivery dates. This helps plan warehouse operations and promise availability dates to customers.

Document Discrepancies

If the received quantity differs from expected, add comments explaining the reason (damaged product, backorder, supplier error).

Problem: When trying to create a replenishment, an error appears or it doesn’t save.

Solution:

  1. Verify that you have permissions to create replenishments
  2. Confirm that required fields are complete
  3. Review date format (YYYY-MM-DD)
  4. Make sure your account is active and not closed

Problem: When searching for SKUs to add to the replenishment, they don’t appear in the list.

Solution:

  • Confirm that SKUs exist in your product catalog
  • Verify that products are not marked as Discontinued
  • Make sure products belong to the correct Distribution Center
  • Review that you’re searching in the correct account

Inventory Doesn’t Update After Processing

Section titled “Inventory Doesn’t Update After Processing”

Problem: After receiving a replenishment, available inventory doesn’t update.

Solution:

  1. Verify that the replenishment is in PROCESSED status
  2. Confirm that you entered quantities in “Qty Received” and not just “Qty Expected”
  3. Review that you specified a valid Bin for inventory
  4. Verify there are no processing errors in system logs
  5. Refresh the inventory page (F5) to see changes

Problem: A replenishment remains in INCOMPLETE status and cannot be changed.

Solution:

  • Make sure you’ve added at least one SKU to the replenishment
  • Verify that all SKUs have quantities greater than zero
  • Complete all required fields (Supplier Name, Expected Delivery Date)
  • Try editing the replenishment and manually changing the status

Received Quantities Don’t Match Expected

Section titled “Received Quantities Don’t Match Expected”

Problem: The physically received quantity is different from the expected quantity in the replenishment.

Solution:

  1. Enter the actual received quantity in “Qty Received”
  2. Add comments explaining the discrepancy
  3. The system will automatically calculate “Qty Remaining” (pending)
  4. If it’s a backorder, create a new replenishment for the missing quantity
  5. If there are damaged products, document the reason and contact the supplier

Problem: When trying to assign a bin during receipt, an error appears.

Solution:

  • Verify that the Bin exists in your location system
  • Confirm that the Bin is active and not blocked
  • Make sure the Bin is valid for the product type
  • If the Bin doesn’t exist, create it first in the Bin Management module

Next Steps:

See Also:

To better understand the complete process, here’s the typical flow:

  1. Create → RequestID generated, Status: INCOMPLETE
  2. Add SKUs → Specify products and expected quantities
  3. Update to IN-TRANSIT → Supplier confirms shipment
  4. Update to ARRIVED → Shipment physically arrives at warehouse
  5. Process Receipt → Count, verify, assign bins
  6. READY FOR YOUR REVIEW → If partial receipt, review pending items
  7. PROCESSED → Inventory updated, automatically archived
  8. Archive → View in archived replenishments list for historical records

This cycle keeps your inventory updated and provides complete visibility of product flow from supplier to your warehouse.