This guide teaches you how to create new replenishment requests directly from the product catalog, selecting multiple SKUs at once and completing shipment information in a modal form.
Make sure you have your supplier information ready: supplier name, purchase order number (PO), tracking number (if available), and the list of SKUs you need to replenish.
Navigate to Catalog
From the main menu, go to Inventory → Catalog or access the catalog page directly.
Select Products
In the catalog table, check the boxes of the products you want to include in the replenishment.
You can select multiple products at once. Each row has a checkbox in the first column.
Tip : Use the “Select All” checkbox in the table header to select all visible products on the current page.
Open Creation Modal
Once products are selected:
Click the Actions button (located in the checkbox column)
Select Create Replenishment from the dropdown menu
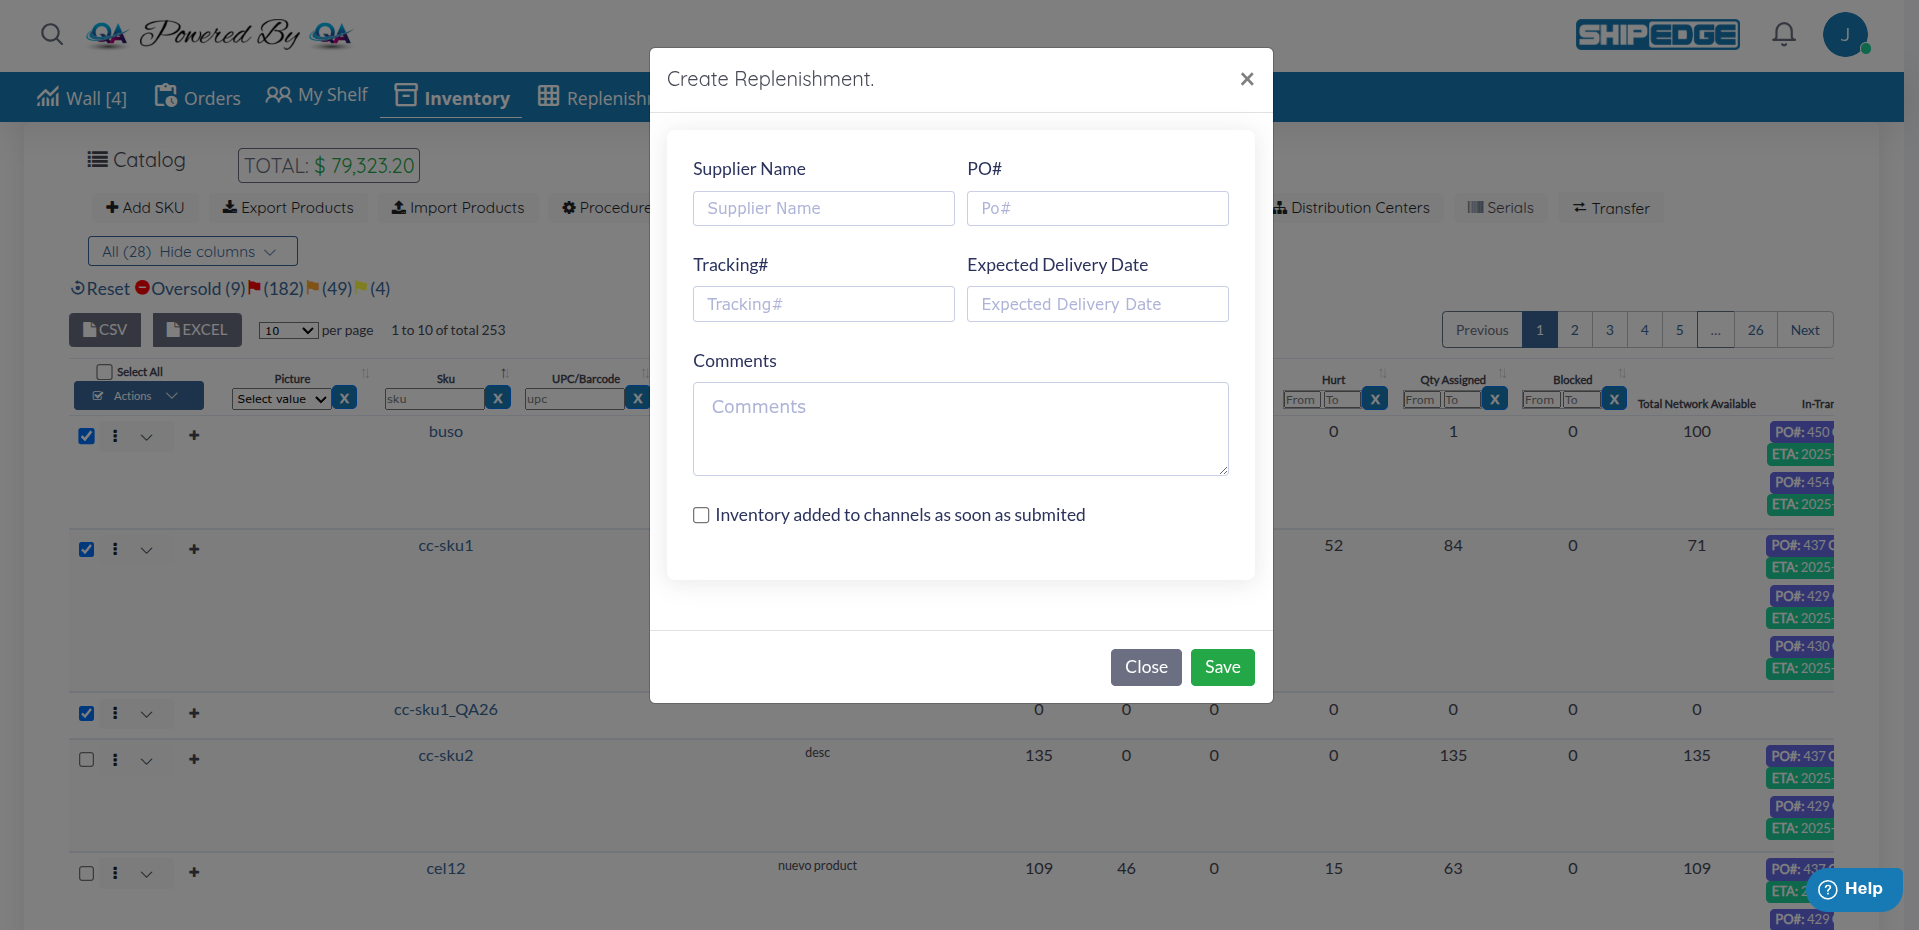
A modal will open with the replenishment creation form.
Complete the Form
The modal displays the following fields:
Field : Supplier NameRequired : RecommendedDescription : The name of the supplier or distributor from whom you’re ordering inventory.
Examples :
“Acme Wholesale Inc.”
“Global Distributors”
“Local Manufacturer”
Best Practices :
Use consistent names to facilitate future searches
If it’s an internal transfer, use “Internal Transfer - [Warehouse Name]”
For dropshippers, clearly specify the dropshipper name
Field : PO#Required : Highly recommendedDescription : Your internal purchase order number to track this request.
Examples :
“PO-2024-001234”
“20240115-ACME-001”
“WH1-2024-Q1-0056”
Best Practices :
Use a consistent numbering system
Include year and month to facilitate filing
Correlate with your purchasing or accounting system
This number helps you track payments and invoices
Field : Tracking#Required : RecommendedDescription : Carrier tracking number to follow the shipment in transit.
Common Carriers :
FedEx: “123456789012” (12 digits)
UPS: “1Z999AA10123456784” (1Z format)
USPS: “9400 1000 0000 0000 0000 00”
DHL: “1234567890”
Best Practices :
Add tracking as soon as supplier provides it
You can update this field later if you don’t have it yet
Use tracking to monitor shipment status
Note : If you’re creating the replenishment before the supplier ships, you can leave it empty and update later.
Field : Expected Delivery DateRequired : Highly RecommendedFormat : YYYY/MM/DD (Year/Month/Day)
Description : The date you expect the shipment to arrive at your warehouse.
Examples :
“2024/03/15” (March 15, 2024)
“2024/12/01” (December 1, 2024)
Best Practices :
Use the estimated date provided by supplier
Be conservative - better early than late
Update this date if supplier provides more accurate information
This date helps plan warehouse reception resources
Validation :
System accepts YYYY/MM/DD format
Must be a future date (cannot be in the past)
Field includes a date picker to facilitate selection
Field : CommentsRequired : NoDescription : Additional notes, special instructions, or relevant information about this replenishment.
Usage Examples :
“Fragile product - handle with care”
“Scheduled delivery for Tuesday morning”
“Includes 3 pallets of heavy merchandise”
“Contact John at reception upon arrival”
“Backorder for customer #12345 - high priority”
Best Practices :
Be specific and concise
Include special reception instructions
Mention if there are customer orders waiting for this inventory
Document any unusual situations
Field : CheckboxRequired : NoDescription : If you check this option, the inventory for products included in this replenishment will be automatically added to your sales channels as soon as you submit the replenishment.
When to Use :
When supplier has already confirmed shipment
When you want inventory to be available immediately after creating the replenishment
For high-demand products that need to be available quickly
When NOT to Use :
If you’re still coordinating with supplier
If shipment hasn’t been confirmed yet
If you prefer to add inventory manually after receiving merchandise
Once the replenishment is created, all selected SKUs are automatically added with quantity 1. You must edit the expected quantities for each product.
Review SKU List
On the details page you’ll see a table with all added products. Each row shows:
SKU : Product codeDescription : Product description (automatically loaded)Qty (units) : Expected quantity (initially 1)Cost : Unit cost (loaded from catalog)Weight : Product weight (loaded from catalog)Hscode : Product Harmonization Code (loaded from catalog)Lot# : Product Lot Number (loaded from catalog)Expiration Date : Product Expiration Date (loaded from catalog)
Edit Expected Quantity
For each SKU:
Click on the Qty (units) field
Enter the number of units you expect to receive from supplier
Press Enter or click outside the field to save
Verify Product Information
Make sure that:
Description corresponds to the correct product
Cost is correct (you can edit it if necessary)
Weight is defined (useful for planning warehouse space)
Repeat for All SKUs
Continue editing quantities for all products in the replenishment.
Review Complete List
Once you’ve edited all quantities, review the complete table:
Total items : Did you add all necessary products?Quantities : Are they correct?SKUs : Are they the correct products?Total cost : Does it look reasonable?
Save the SKUs added
Click the Save button to save the skus added to the replenishment.
Submit the Replenishment
Click the SubmitReplenishment button to submit the replenishment.
If you need to add more products or remove some after creating the replenishment:
On the replenishment details page, look for the section to add SKUs
Enter the SKU code of the product you want to add
System will automatically load product information
Enter expected quantity
Insert the new item
Locate the SKU you want to delete in the table
Click the Delete button
Confirm deletion if prompted
SKU is removed from list
Once you’ve edited all quantities:
Review Complete Information
Verify:
✅ All SKUs are included
✅ Quantities are correct
✅ Supplier information is accurate
✅ Expected delivery date is reasonable
Save All Changes
Make sure all changes are saved:
Added SKUs appear in list
Quantities saved correctly
Status updated if you changed it
Note the Request ID
System generates a unique RequestID (example: “12345”).
Save this number for:
Tracking the replenishment
Communicating with supplier
Finding the replenishment later
Coordinating receipt with warehouse team
Notify Receipt Team (Optional)
If it’s an important shipment:
Inform warehouse team about incoming shipment
Provide RequestID
Indicate expected arrival date
Mention any special instructions from comments
Before creating the replenishment, have complete information ready: list of SKUs with quantities, supplier information, and estimated dates.
Develop a standard numbering system for POs. Example: “PO-[Year]-[Month]-[Sequential]” like “PO-2024-03-0001”.
Before selecting products in the catalog, verify that SKU codes are exact. A typo can cause you to add the wrong product.
Use the comments field for important notes: fragile products, scheduled deliveries, customer backorders, etc.
When supplier provides tracking number, update it in the replenishment immediately. Facilitates shipment monitoring.
Take advantage of the ability to select multiple products at once from the catalog. This significantly speeds up the creation process.
Problem : When trying to add a SKU, it doesn’t appear in the search list.
Solutions :
**Verify SKU exists ** in your product catalog
Check exact name - Verify you have typed the exact name of the SKUConfirm it’s not discontinued - Discontinued products may not be addedCreate product first - If it doesn’t exist in the catalog yet
Problem : When clicking “Create Replenishment”, a message appears indicating you must select at least one product.
Solutions :
Make sure you’ve checked the boxes of products you want to include
Verify checkboxes are actually checked (they may appear visually checked but not be selected)
Try selecting products again
Problem : When clicking “Save”, an error appears or it doesn’t save.
Solutions :
Verify expected delivery date - Must be in correct format (YYYY/MM/DD)Complete required fields - some systems require Supplier Name and Expected DateVerify permissions - Confirm you have authorization to create replenishmentsTry reloading page - Sometimes there are session issuesVerify you’ve selected products - There must be at least one SKU selected
Problem : Quantity fields are locked or cannot be edited.
Solutions :
Check status - Some statuses (PROCESSED, ARCHIVED) don’t allow editingUse correct function - Look for “inline Edit” button before making changesInsufficient permissions - May need administrator role to edit replenishmentsContact administrator - If urgent, administrator can unlock or make changes
Problem : When clicking “Create Replenishment”, the modal doesn’t appear.
Solutions :
Verify you’ve selected products - You must have at least one checkbox checkedTry another browser - Sometimes there are compatibility issuesReload page - There may be script loading issues
Next Steps:
See Also:
Complete Process:
Create Replenishment ← You are hereUpdate to IN-TRANSIT → See Replenishment Overview Receive Merchandise → WMS receipt documentation (coming soon)Archive → See Archived Replenishments