Catalog Overview
- Modern interface for viewing all SKUs
- Click SKU to open in edit mode
- Access to SKU Substitutions, Suppliers, Attributes
- Transfer products
- Change pick styles
- View product history
SKU Management lets you control the complete lifecycle of your product SKUs from creation to discontinuation and deletion. Manage active inventory, set up alternative SKUs for replacements, and track changes across your catalog.
Smoothly transition from old to new products by discontinuing and setting up alternatives.
Prevent new orders for discontinued items while clearing existing stock.
Maintain historical records while safely removing obsolete SKUs from active inventory.
Set up alternative SKUs for automatic replacement when original SKUs are unavailable.
A SKU progresses through three main states:
Active → Discontinued → DeletedState: Discontinued = 'N'
State: Discontinued = 'Y'
State: Removed from products table
Open the Product
Navigate to Inventory, then click on the SKU you want to discontinue. This opens the product in the editing interface.
Click “Discontinue”
In the product form, locate the Discontinue button at the top-left of the form (next to the product header). The button shows a notification-off icon and includes an info icon.
Review Active Orders
A confirmation dialog appears showing any orders in the following statuses:
The Discontinue button in the dialog is disabled if active orders exist.
Confirm Discontinuation
If no active orders exist, the Discontinue button becomes enabled. Click it to confirm.
The SKU status changes and the form updates:
Set Up Alternative SKU (Optional but recommended)
If you have a replacement product, navigate to SKU Substitutions from the Catalog toolbar to assign an alternative.
Open the Discontinued Product
Navigate to Inventory, then click on the discontinued SKU. This opens the product in the editing interface.
Click “Save & Re enable”
The Save button automatically changes to Save & Re enable (with a show icon) for discontinued SKUs. This button appears at the top-right of the form.
Save Changes
Click Save & Re enable to save any changes and reactivate the SKU.
System immediately changes the status to Discontinued = 'N' and:
The SKU becomes available for new orders again.
Discontinue the SKU First
Follow the discontinuation process above. The SKU must have Discontinued = 'Y'.
Open the Discontinued Product
Navigate to the product in Catalog and click on the discontinued SKU to open it in the editing interface.
Click “Delete”
The Delete button (red, with trash icon) appears at the top-left of the form, replacing the Discontinue button for discontinued SKUs.
Confirm Deletion
A confirmation dialog appears. System checks for:
If checks pass, click OK to permanently remove the SKU.
SKU is Removed
The SKU is deleted from the products table. Historical references remain in order history and transaction logs.
Alternative SKUs provide automatic substitution when the original SKU is unavailable or discontinued.
Alternative SKUs are replacement products that the system can automatically use when:
Example Use Cases:
Open the Product
Navigate to Inventory, then click on the SKU you want to set up an alternative for. This opens the product in the editing interface.
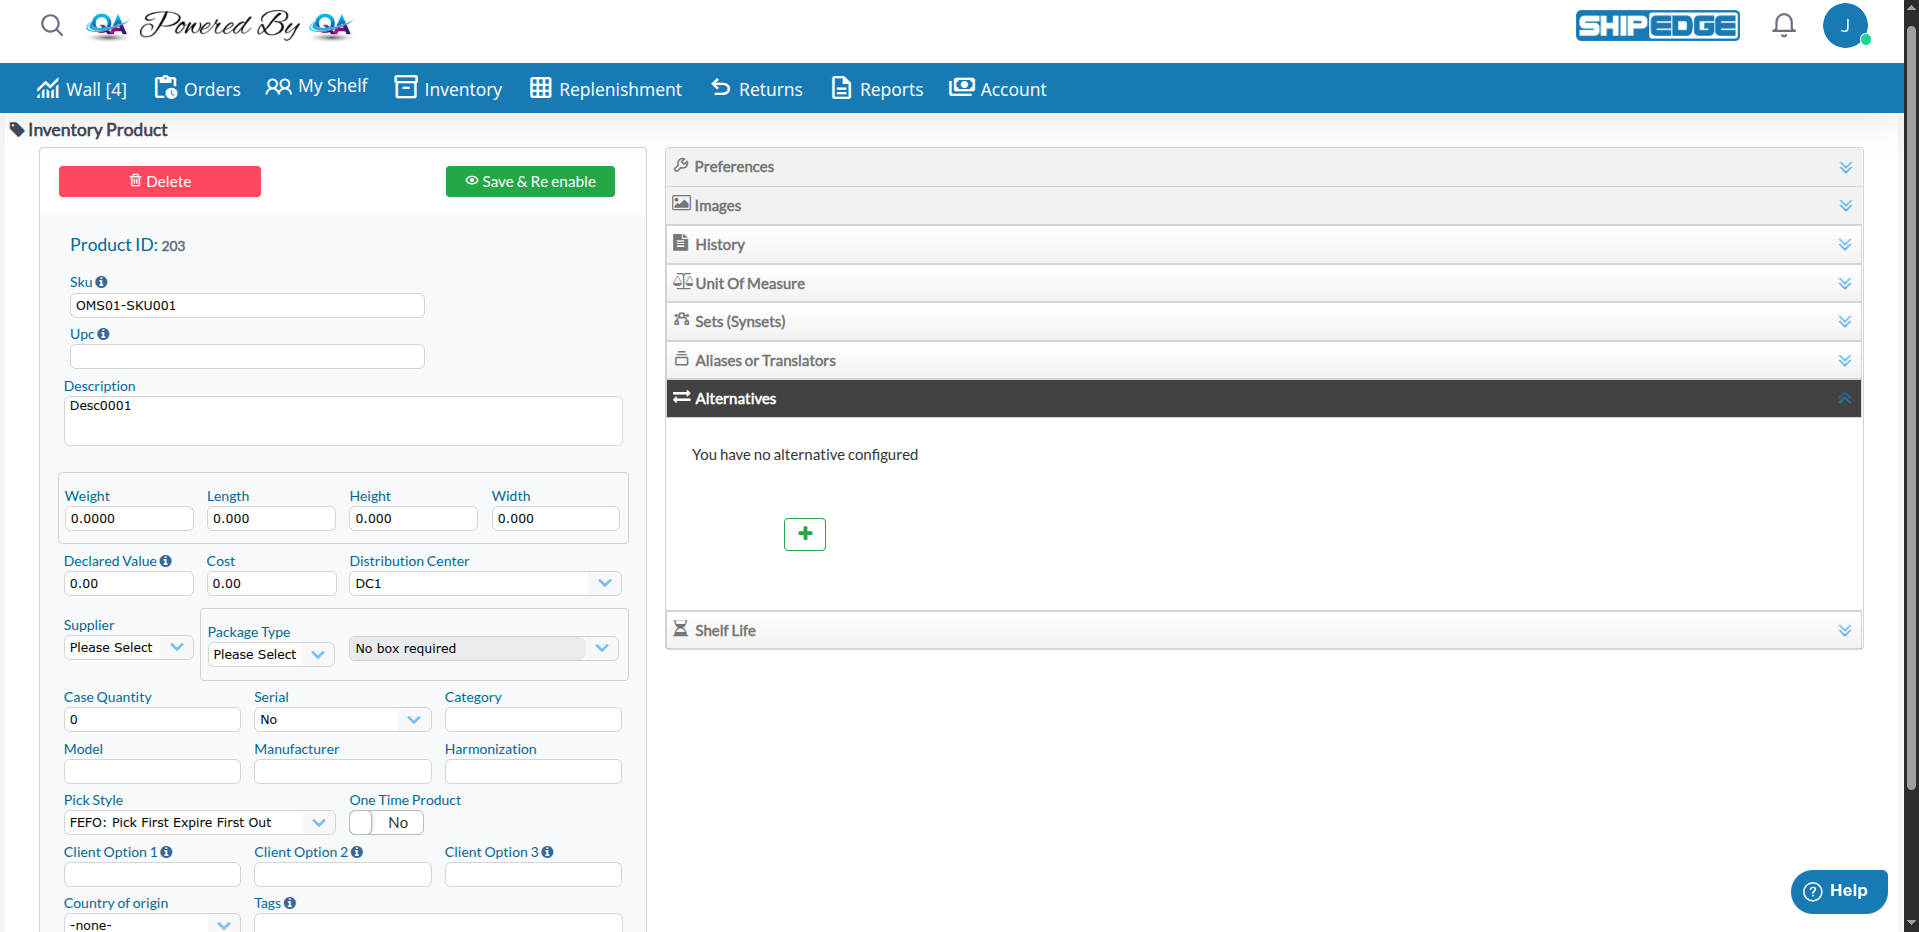
Expand the Alternatives Section
In the product form, locate the accordion panel titled Alternatives. Click to expand this section.
Click “Select an Alternative”
If no alternative is configured, you’ll see a card with the message “You have no alternative configured” and a button with a plus icon. Click this button to select an alternative.
Choose Relationship Type
A modal dialog appears with tabs:
Click the appropriate tab based on your needs.
Search and Select Alternative
Use the search field to find the SKU or synset that will serve as the alternative. Click on the Select button to select it.
Save the Alternative
Click Confirm in the modal to create the alternative relationship. The form updates to show the configured alternative with options to edit, remove, or trace the relationship.
The Alternatives tab displays a table with:
Actions Available:
Every change to a SKU is tracked in the system:
To View SKU History:
Open the Product
Navigate to Inventory, then click on the SKU you want to view.
Access History Tab
In the product editing interface, click the History tab on the right side of the form.
Review History
View all changes chronologically with:
Alternative Access:
SKU management operations are available in multiple places:
Catalog Overview
Creating/Editing Products
SKU Substitutions
Product Attributes
SKU History
Always discontinue a SKU first to ensure no active orders exist. Only delete after stock is depleted.
When discontinuing a SKU, immediately set up alternatives to prevent order fulfillment issues.
Use the product description or notes to document why a SKU was discontinued for future reference.
Before deleting, verify that all inventory is depleted and no pending transactions exist.
Follow these best practices when creating SKUs:
Recommended Format:
SHIRT-BLU-M instead of Item1)Examples:
LAPTOP-15IN-BLK, CASE-IPHONE14-RED, BOOK-PYTHON-2023Item #1, Product (Blue), SKU/123, New ProductProblem: System prevents discontinuation.
Common Causes:
Solutions:
Problem: Delete button not available or deletion fails.
Common Causes:
Discontinued = 'Y')Solutions:
UnitsInStock = 0 across all locationsProblem: System doesn’t use the alternative SKU.
Common Causes:
Solutions:
Problem: Cannot create SKU due to duplicate error.
Solutions:
SKU1 and sku1 as differentNext Steps: Catalog Overview | Creating Products | Product Attributes