Organize Picking Work
Create picking jobs to organize work efficiently. Group products by location, account, or other criteria for faster picking.
Esta página aún no está disponible en tu idioma.
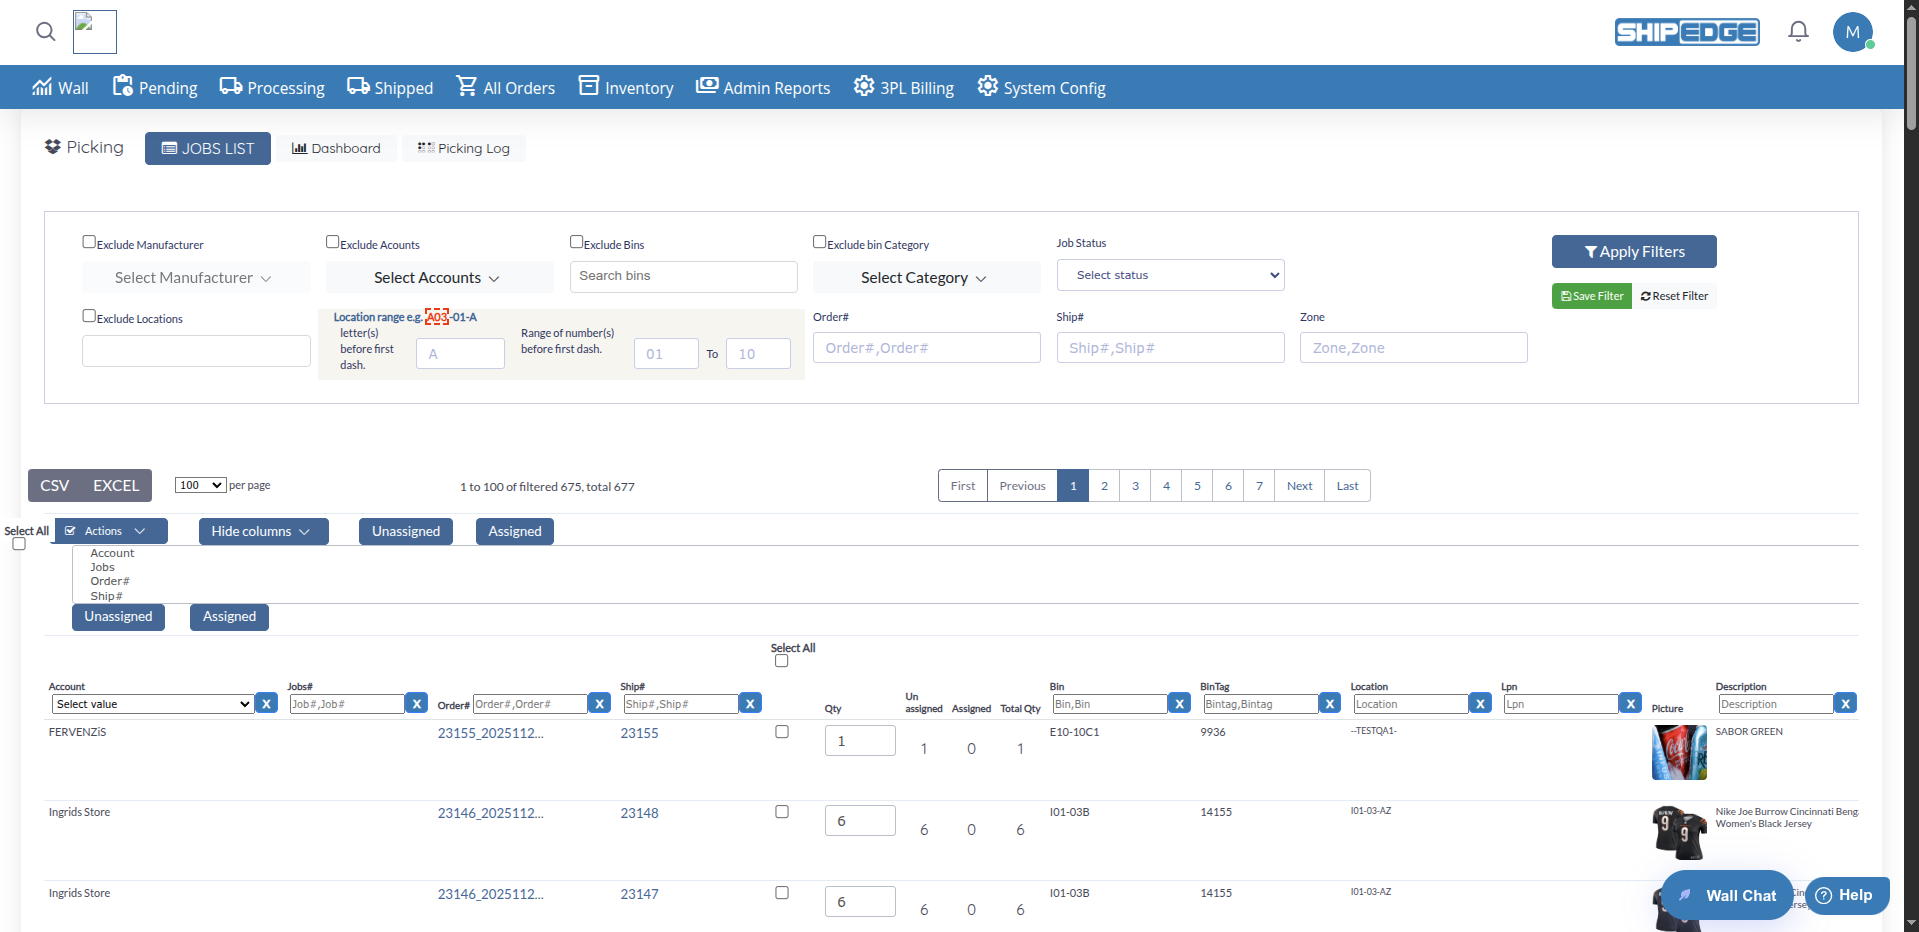
Picking Operations helps you manage the picking process for orders in processing status. Create picking jobs, assign products to specific bins, track what’s been picked, and print picking summaries for warehouse staff. This page shows all products that need to be picked from bins to fulfill orders.
Create picking jobs to organize work efficiently. Group products by location, account, or other criteria for faster picking.
See which products are assigned to bins and which still need assignment. Track picking progress in real-time.
Generate picking summaries for warehouse staff. Print lists showing what to pick, from which bins, and in what quantities.
Filter products by account, manufacturer, bin, location, zone, order number, and many other criteria to focus on specific picking tasks.
Navigate to Picking
Click Picking in the warehouse navigation menu. The page loads showing all products that need to be picked for orders in processing status.
View Product Table
Browse the table showing key information: Account, Jobs#, Order#, Ship#, Quantity, Unassigned quantity, Assigned quantity, Bin, Location, SKU, Description, and more.
Filter Products
Use the filter form at the top to narrow down products by account, manufacturer, bins, locations, zones, order numbers, or other criteria. Click Apply Filters after setting values. Use Reset Filter to clear.
Create Picking Jobs
Enter quantities, select products, and click Actions → Create Jobs (alt+p) to create picking jobs.
Export Data
Use the CSV button in the DataTables toolbar to export the current view.
Located at the top of the page:
Open a modal to view all created picking jobs. See job status, assigned products, and manage existing jobs. Print or delete jobs from here.
Open the picking dashboard in a modal to view statistics, job counts, and picking metrics.
View the selection log that shows the history of all selection activities and completed jobs.
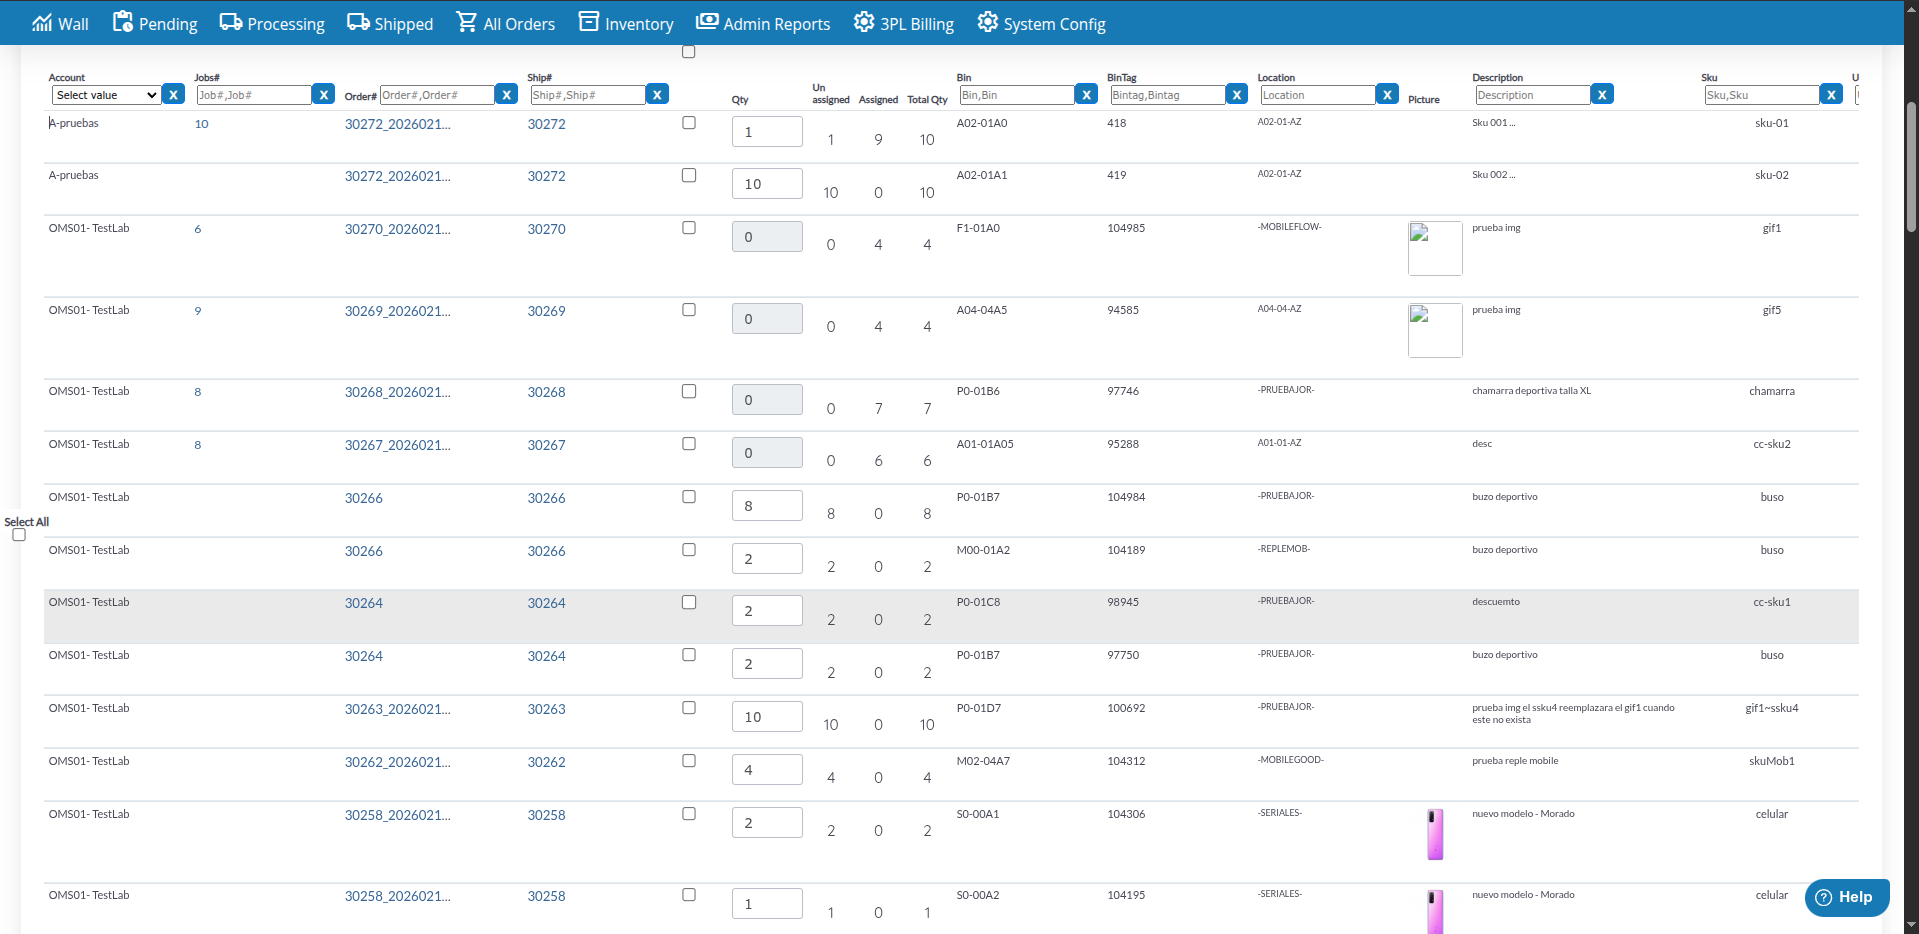
The picking operations table displays the following information:
Customize which columns to display:
Open Column Selector
Use the column selector dropdown (multiselect) above the table.
Select Columns
Check or uncheck columns to show or hide them.
Save Preferences
Your column preferences are saved automatically for future sessions.
Basic Filters:
Location Range Filter:
The location range filter helps you pick products from a specific area:
Quick Filters:
Save Filters:
Save frequently used filter combinations:
Apply Filters
Set up your desired filter combination.
Click Save Filter
Click the Save Filter button.
Enter Details
In the Save filter modal, enter a name in Name filter, a description in Description, and choose a color.
Save
Click Save filter to store the filter.
Load Later
Click on saved filters from the filter list to apply them quickly.
Create picking jobs to organize picking work:
Select Products and Enter Quantities
For each product row, enter the quantity to pick in the quantity input field. Check the checkbox next to each product you want to include in the job. You can use Select All to select all visible products.
Open Actions Menu
Click the Actions dropdown button (blue button with checkmark icon).
Select Create Jobs
Click Create Jobs (alt+p) from the dropdown menu.
Job Created
The system creates the job with the selected bins and quantities. A success message shows the new Job#. The table refreshes automatically.
View and manage created picking jobs from the JOBS LIST modal:
Open Jobs List
Click the JOBS LIST button in the page header. A modal opens showing all picking jobs.
View Jobs
See all created picking jobs with Job#, Order#, Ship#, User, quantities, status, and time information. Use Apply filter and Reset filter to narrow results.
Print Picking Summary
Select jobs using the checkboxes, then click Actions → Print Picking Summary. A new modal opens with the printable picking list. Click Print to print.
Delete Jobs
Select jobs using the checkboxes, then click Actions → Delete Jobs to remove jobs that are no longer needed.
Refresh
Click Refresh to reload the jobs table with the latest data.
When creating a picking job, you assign quantities from specific bins:
Find Product
Locate the product in the table. Each row represents a bin with available quantity.
Check Quantities
Review the Qty Unassigned and Qty Assigned columns to see assignment status. Use the Unassigned and Assigned quick filter buttons to focus on specific products.
Enter Quantity
In the quantity input field for each row, enter the amount you want to include in the picking job. The quantity cannot exceed the available unassigned amount.
Select and Create
Check the checkbox for each row you want to include, then click Actions → Create Jobs (alt+p). The job is created with your selected bins and quantities.
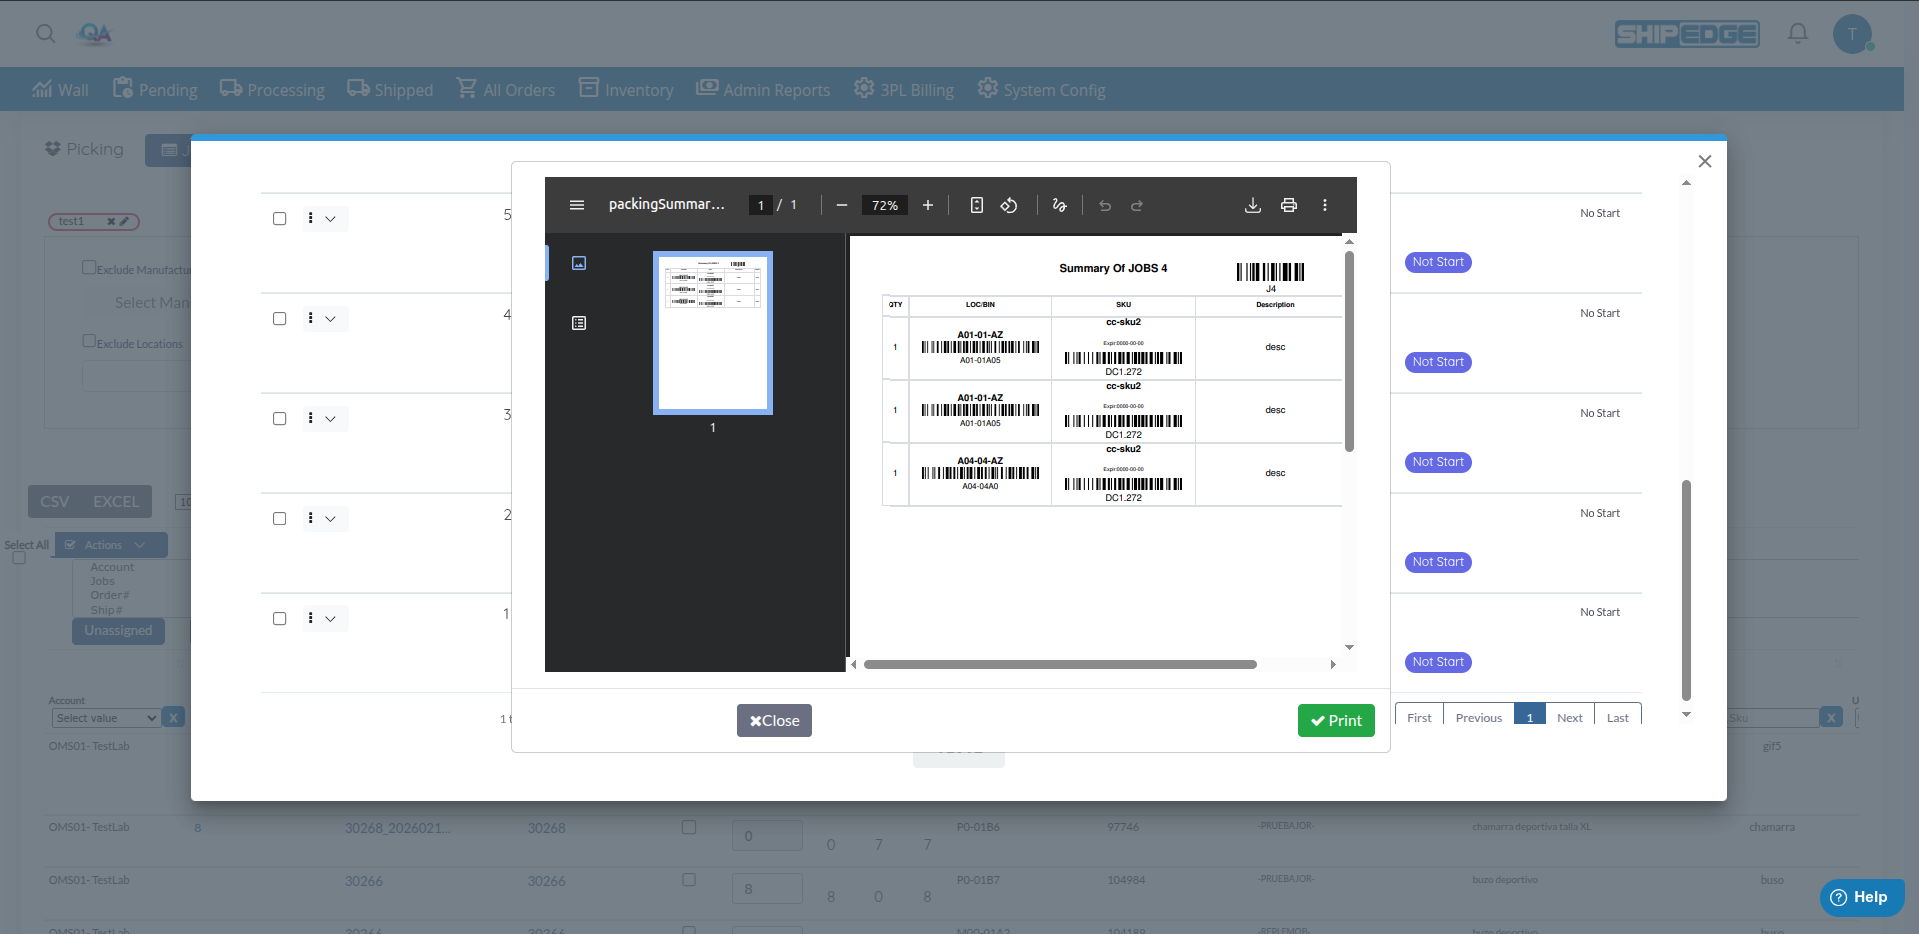
Generate picking summaries for warehouse staff. Printing is done from the JOBS LIST modal:
Open Jobs List
Click JOBS LIST in the page header.
Select Jobs
Check the boxes next to the jobs you want to print.
Open Actions Menu
Click the Actions dropdown in the Jobs List.
Select Print Picking Summary
Click Print Picking Summary from the menu.
Review and Print
A modal opens with the picking summary. Click Print to print for warehouse staff.
Use location filters to organize picking by warehouse zones. Pick products from one area before moving to another to reduce travel time.
Group products by account when creating jobs. This makes it easier to track which customer’s orders are being picked.
Regularly filter by “Unassigned” to see products that still need bin assignment. Complete assignments before creating picking jobs.
Save frequently used filter combinations (like “Zone A Unassigned”) to quickly access the same product groups.
Always print picking summaries before sending staff to pick. This ensures they have accurate information about what to pick and where.
Problem: Create Jobs button is disabled or doesn’t work.
Solutions:
Problem: Expected products don’t appear in the picking table.
Solutions:
Problem: Can’t assign quantities to bins for products.
Solutions:
Problem: JOBS LIST button doesn’t open the jobs modal.
Solutions:
Problem: Print Picking Summary doesn’t generate or print.
Solutions:
Problem: Applied filters don’t show expected results.
Solutions:
Next Steps:
Related Features: