Generated Costs shows a complete list of all warehouse invoices containing costs automatically generated by the system. These invoices are created when the system calculates and records service charges such as handling, storage, shipping, man hours, and other warehouse services.
This tool lets you view, search, edit, and manage all generated cost invoices, providing complete control over warehouse billing and allowing you to review details before they become final statements.
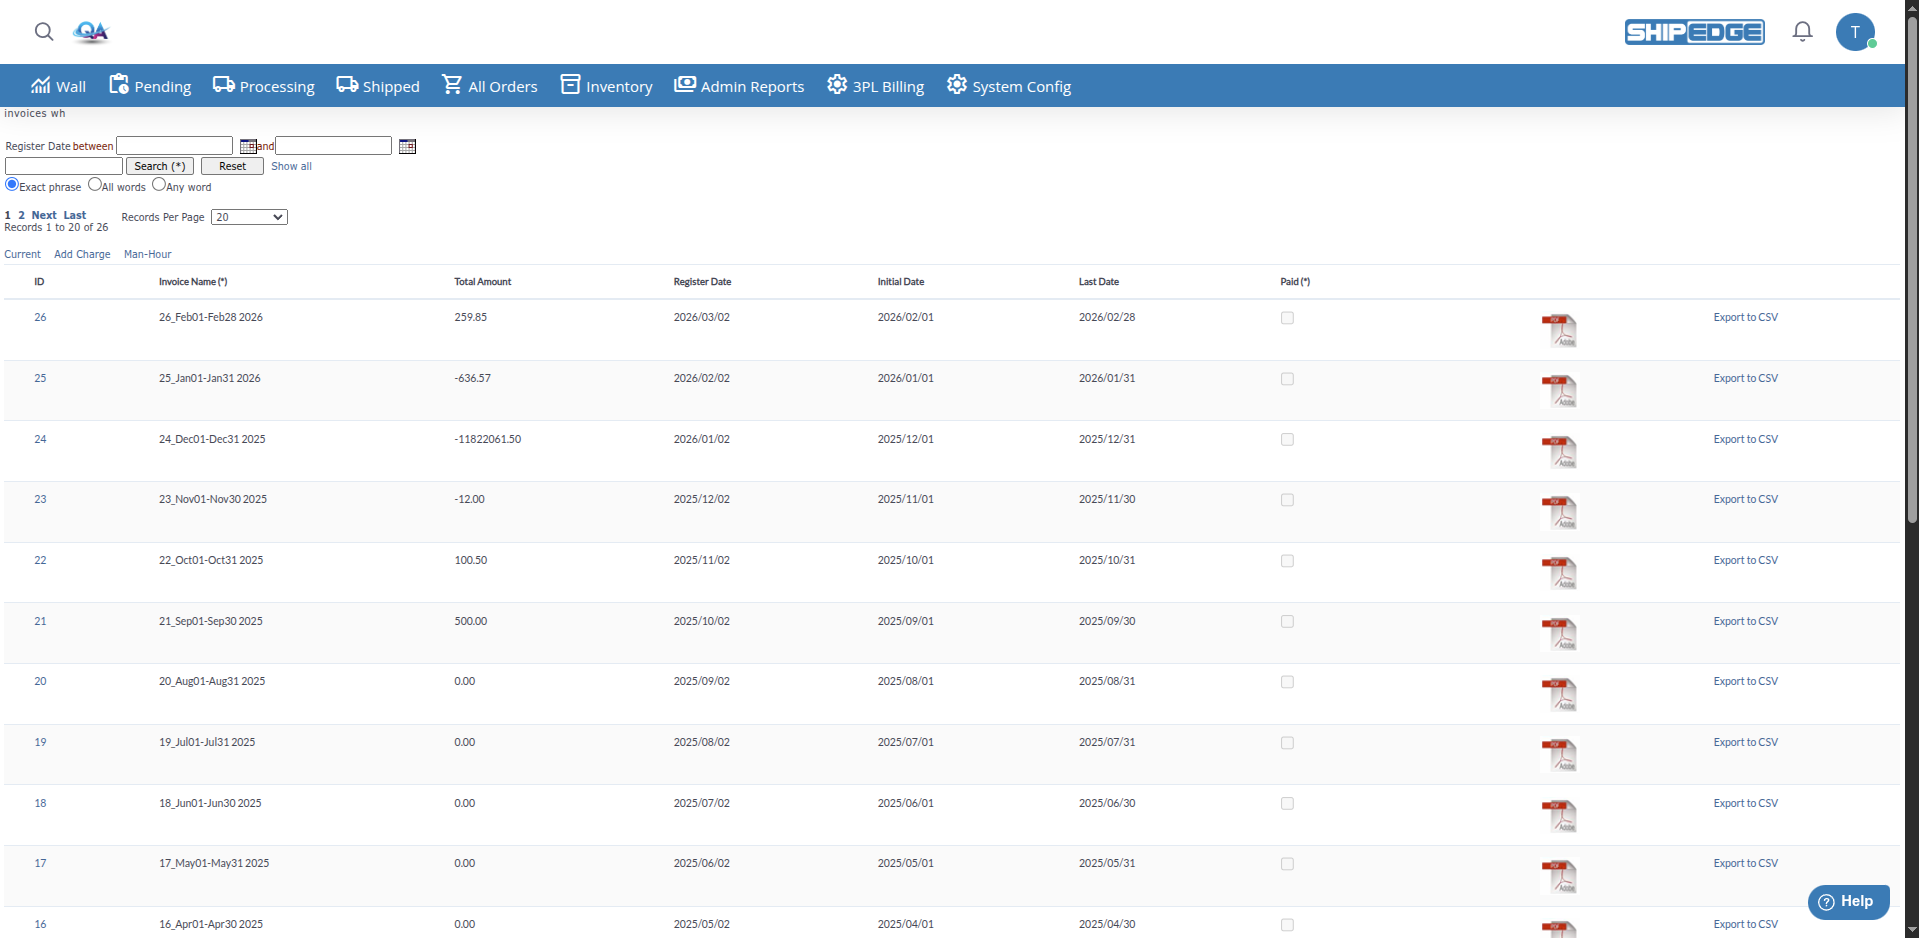
See all invoices with automatically generated costs in one place, including billing period and total amount of each invoice.
Edit invoice names, total amounts, dates, and payment status directly from the list to keep information up to date.
Click on any invoice ID to see complete details of the partial costs that make it up.
Show or hide invoices as needed, allowing you to keep the view of active invoices organized.
Search invoices by name, registration date, or billing period to find specific information quickly.
Mark invoices as paid directly from the list and set payment dates to maintain accurate financial status records.
You can access Generated Costs from:
- Admin Reports Menu: Navigate to Admin Reports > Generated Costs
-
Access the page
Navigate to Admin Reports > Generated Costs from the main menu.
-
Review the invoice list
The table shows all generated cost invoices with the following columns:
- ID: Unique invoice number (click to view details)
- Invoice Name: Descriptive name of the invoice
- Total Amount: Total amount of the invoice
- Register Date: Date when the invoice was registered
- Initial Date: First date of the billing period
- Last Date: Last date of the billing period
- Paid: Indicates if the invoice is paid
-
View invoice details
Click on the ID number of any invoice to see complete details of the partial costs that make it up. This will take you to the partial costs list filtered by that invoice.
-
Search for specific invoices
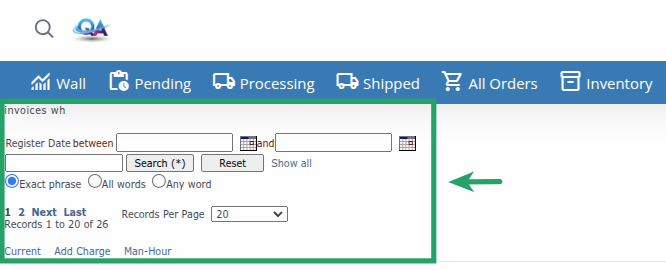
Use the search form to filter by:
- Register Date: Select a date range using the two calendar fields (between start and end date)
- Basic search: Enter text in the search field and select the type (Exact phrase, All words, Any word). Basic search looks in Invoice Name, Paid, and Visible.
Click Search (*) to apply filters, Reset to clear the form, or Show all to view all records.
-
Edit an invoice
If you have edit permissions:
- Click Inline Edit in the invoice row
- Modify fields directly in the table:
- Invoice Name: Invoice name
- Total Amount: Total amount
- Register Date: Registration date
- Initial Date: First date of the billing period
- Last Date: Last date of the billing period
- Paid: Check or uncheck the checkbox
- Visible: Check or uncheck the checkbox (administrators only)
- Paid Date: Enter payment date (administrators only)
- Click Update to save changes
-
Access current costs
Click the Current link at the top to see partial costs that haven’t been assigned to a specific invoice yet.
-
Add manual charges
Click Add Charge to add additional manual charges to generated costs.
-
Register man hours
Click Man-Hour to register man hours for all accounts.
- ID: Unique number that identifies each invoice. Click this number to see complete details of the partial costs that make up the invoice.
- Invoice Name: Descriptive name of the invoice. Generally includes information about the billing period (e.g., “January 2024”, “Q1-2024”).
- Total Amount: Total sum of all costs included in the invoice. This amount is automatically calculated by summing all associated partial costs.
- Register Date: Date when the invoice was created and registered in the system.
- Initial Date: First date of the billing period covered by this invoice.
- Last Date: Last date of the billing period covered by this invoice.
- Paid: Indicates if the invoice has been marked as paid. Administrators can mark invoices as paid directly from the list.
Advanced search allows filtering by date range:
- Register Date: Select a date range using the calendars (format: yyyy/mm/dd). Use the first field for the start date and the second for the end date. The operator is “between”.
- The system will search for invoices whose registration date is within the specified range
Basic search searches the following fields:
You can choose between three search types:
- Exact phrase: Searches for the exact phrase
- All words: All words must appear
- Any word: Any word can appear
At the top of the page you’ll find several useful links:
- Current: Opens the list of partial costs that haven’t been assigned to a specific invoice yet (InvoiceNameWh = “current”)
- Add Charge: Opens a popup window to add additional manual charges
- Man-Hour: Opens a popup window to register man hours for all accounts
Each invoice row has the following actions available:
- View Details: Click on the ID to see the partial costs that make up the invoice
- PDF: Icon to open the invoice summary as a PDF
- Export to CSV: Link to export the invoice’s partial costs to a CSV file
You can edit invoices directly in the table:
- Click Inline Edit in the row you want to edit
- Editable fields will become input controls
- Modify values as needed
- Click Update to save changes or Cancel to discard them
- Invoice Name: Free text (maximum 255 characters)
- Total Amount: Decimal number
- Register Date: Date (format: yyyy/mm/dd) with calendar selector
- Initial Date: Date (format: yyyy/mm/dd)
- Last Date: Date (format: yyyy/mm/dd)
- Paid: Checkbox (Yes/No)
- Visible: Checkbox (Yes/No, administrators only)
- Paid Date: Date (format: yyyy/mm/dd, administrators only)
The table shows 20 records per page by default. You can change this using the Records Per Page dropdown at the bottom:
- 10 records per page
- 20 records per page (default)
- 50 records per page
- 100 records per page
- 200 records per page
- 500 records per page
- All Records (all records)
Use pagination controls (First, Previous, page numbers, Next, Last) to navigate between pages.
Review Generated Costs regularly to ensure all invoices are correctly generated and organized before creating final statements.
Always click on the ID to review partial cost details before marking an invoice as paid or generating a statement.
Keep invoice names clear and descriptive that indicate the billing period (e.g., “January 2024”, “Q1-2024”) to help identification.
Make sure Initial Date and Last Date correctly reflect the billing period covered by the invoice.
Use the Visible function to hide old or processed invoices, keeping the view focused on active and relevant invoices.
Regularly review the “Current” link to see costs that haven’t been assigned to an invoice yet and make sure they’re processed correctly.
- Verify that you have Warehouse Billing permissions
- Make sure generated invoices exist in the system
- If you see “Please enter search criteria”, you submitted a search without entering any terms. Click Show all to view all records.
- Hidden invoices (Visible = ‘N’) may not appear depending on your role
- Verify applied search filters
- Verify that you have edit permissions (CanEdit)
- Some fields are only editable by administrators
- Make sure the invoice isn’t locked or in generation process
- Make sure to click Update after editing
- Verify that entered values are valid (dates in correct format, valid numbers)
- Reload the page and verify that changes have been applied
- Verify that you have the necessary permissions for these functions
- Some functions may be restricted according to your role
- Contact the administrator if you need access to these functions