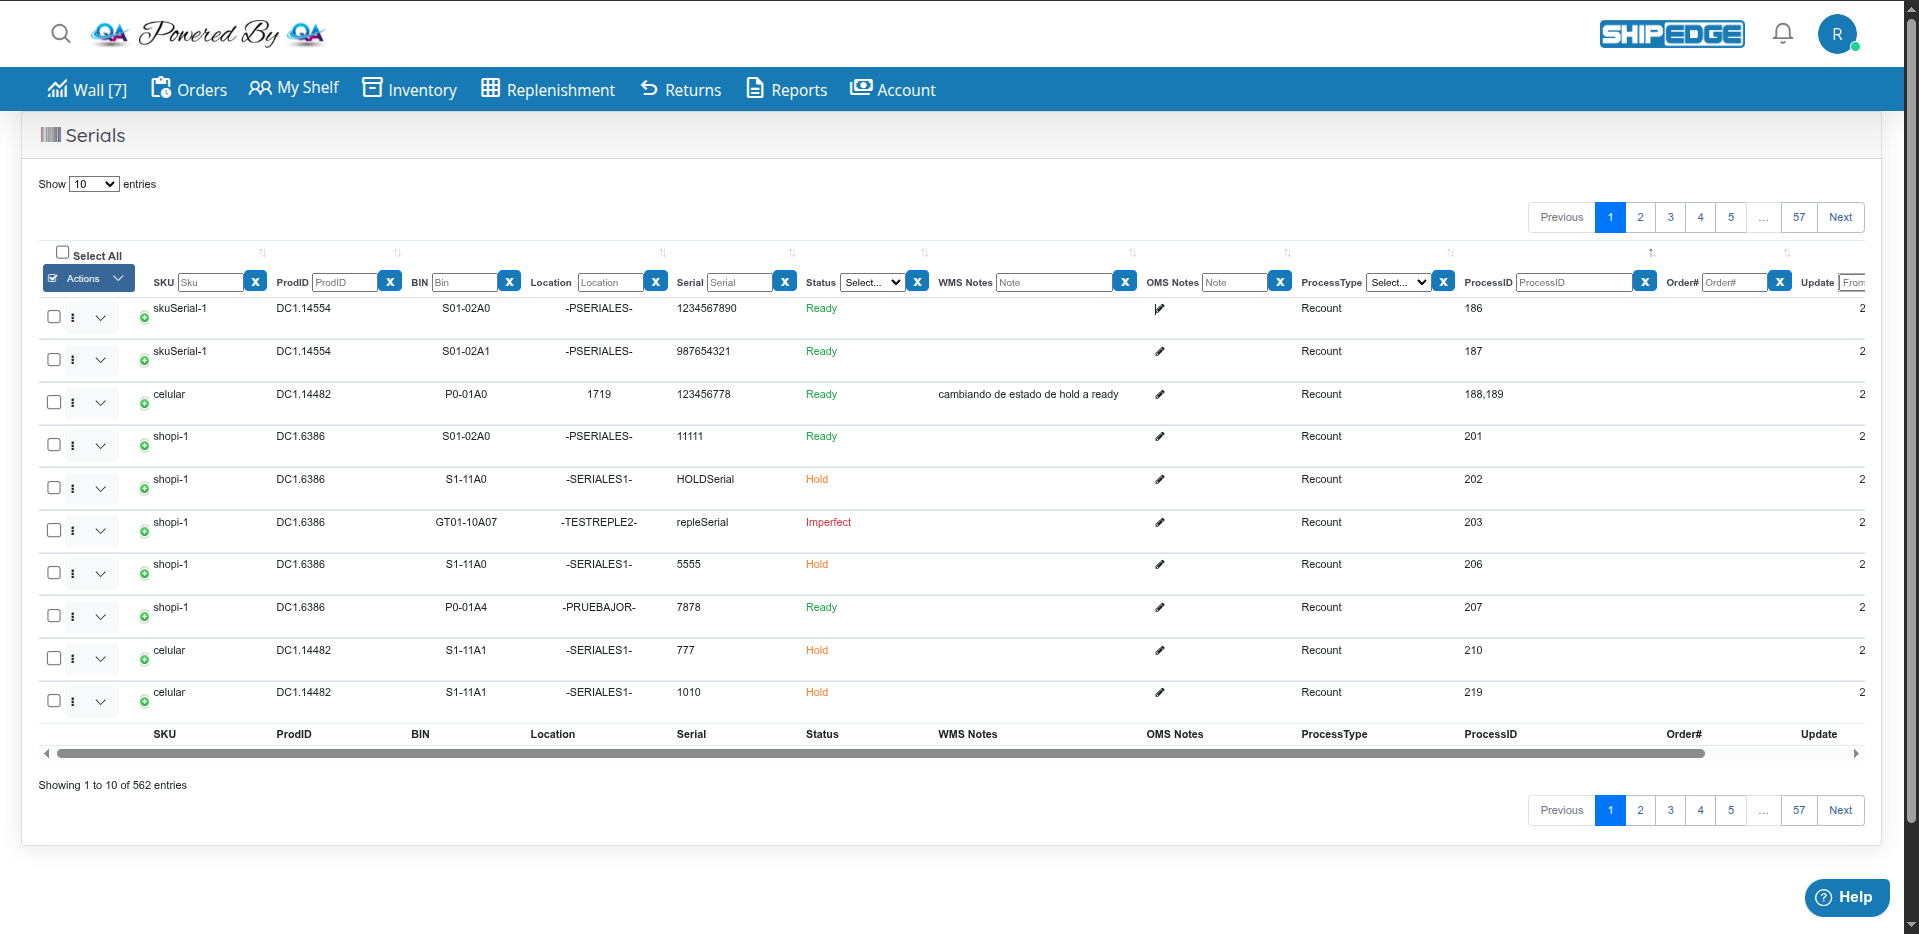
One place for every serial
See SKU, ProdID, bin, location, serial value, status, WMS and OMS notes, process type, process ID, order number, and last update in a single sortable table.
Esta página aún no está disponible en tu idioma.
The Serials page lists serialized units tied to your products (SKU, bin, location, status, and related order or process). Use it to review what the warehouse recorded, add OMS Notes, attach attributes, and download history for reporting or support.
Sign in to the OMS
Use an OMS Account
Open Inventory
In the main navigation, click Inventory.
Open Serials
In the Inventory view, click Serials. The page title in the header is Serials (barcode icon).
Each SKU has a Serial attribute that sets how serial numbers are controlled. Choose one of these workflows (or No if you do not need serial tracking):
Out — There are no special rules on incoming inventory. Serial control happens when the product is shipped: the warehouse team enters serial numbers at shipping time.
In/Out — Serial numbers must be registered before an item can ship. You can define serials when you create a replenishment, or the warehouse can assign them when they receive the inventory.
Out in Bulk — Serials are handled in bulk at shipping (exact behavior depends on your account setup).
If serial tracking does not apply, leave the attribute as No.
Statuses show where a serial is in its lifecycle. Serial records stay in the system; the status reflects the current stage.
| Status | Description |
|---|---|
| Out | The serial has been shipped, and inventory has decreased. |
| Hold | The serial is in a reserved BIN (may be blocked or staged). Contact your warehouse team for details. |
| Imperfect | The serial is in a BIN used for damaged or hurt inventory. |
| Ready | The serial is in a BIN and ready to be shipped. |
| Reserved | Used when a serial is reserved in the workflow (your warehouse can explain how this appears for your account). |
| Incoming | The serial was requested when a replenishment was created and is expected to be received by the warehouse team. |
Use this when you edit one product at a time (not bulk upload or bulk attribute edit).
Open Inventory and find the SKU
In the OMS, go to Inventory and search for the SKU you want. Click the SKU name to open the product details view.
Set the Serial field
Find the Serial attribute and choose the workflow (Out, In/Out, Out in Bulk, or No) as required for that SKU.
Save
Click Save.
Replenishment behavior is different mainly for In/Out SKUs, because serials must exist before shipping. For Out and Out in Bulk SKUs, creating a replenishment works like a standard replenishment.
Keep in mind:
The system creates serial numbers for you. You cannot change those generated serial values afterward.
Start a replenishment
Go to Replenishment in the OMS and choose Add Replenishment
Add SKUs and save
Select the SKUs and quantities, add them to the replenishment, then click Insert.
Generate serials (while status is Incomplete)
While the replenishment is still Incomplete, select all lines that should get generated serials, then click Generate Serials.
Use the popup
A popup opens. From it you can download all serials or download serials for one SKU, and generate serial labels for all SKUs or for one SKU.
Submit the replenishment
Finish by clicking Submit Replenishment
Confirm in Serials
Open Inventory → Serials. New serials appear in Incoming status, in the same quantity as the units requested, and are tied to the replenishment ID.
Warehouse receiving
Your warehouse processes the replenishment. You can give them the generated serials or they can access them on their side. After the replenishment is received, those serials move to Ready status.
You can skip generating serials in the OMS and let the warehouse create or assign serials on their side instead.
Column headers include filter controls (YADCF) tied to each column:
| Column / area | Filter behavior (from code) |
|---|---|
| SKU | Text; filter placeholder Sku (partial match on SKU) |
| ProdID | Text; placeholder ProdID (matches ProductIDWH or ProductID) |
| BIN | Text; placeholder Bin |
| Location | Text; placeholder Location |
| Serial | Text; placeholder Serial |
| Status | Dropdown (default Select…): Out, Hold, Imperfect, Ready, Reserved, Incoming |
| WMS Notes | Text (placeholder Note) |
| OMS Notes | Text (placeholder Note) |
| ProcessType | Dropdown (default Select…): Order, Replenishment, Return, Re-count, Move |
| ProcessID | Text; placeholder ProcessID |
| Order# | Text; placeholder Order# (matches Opt2 / internal order number) |
| Update | Date range (yyyy-mm-dd) |
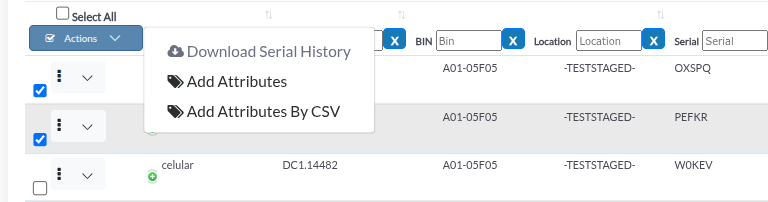
Select rows
Use the Select All checkbox in the first column header, or check individual rows.
Open the Actions menu
In the first column header, click Actions (check-square icon). Options:
Per-row menu
Click the vertical ellipsis on a row and choose Attributes to open the same attributes experience for that serial only. There you can view, edit, or delete attributes; click Save when you are done.
If you choose Download Serial History with no rows checked, the app shows a dialog titled Alert with the message You must check at least one.
Open the dialog
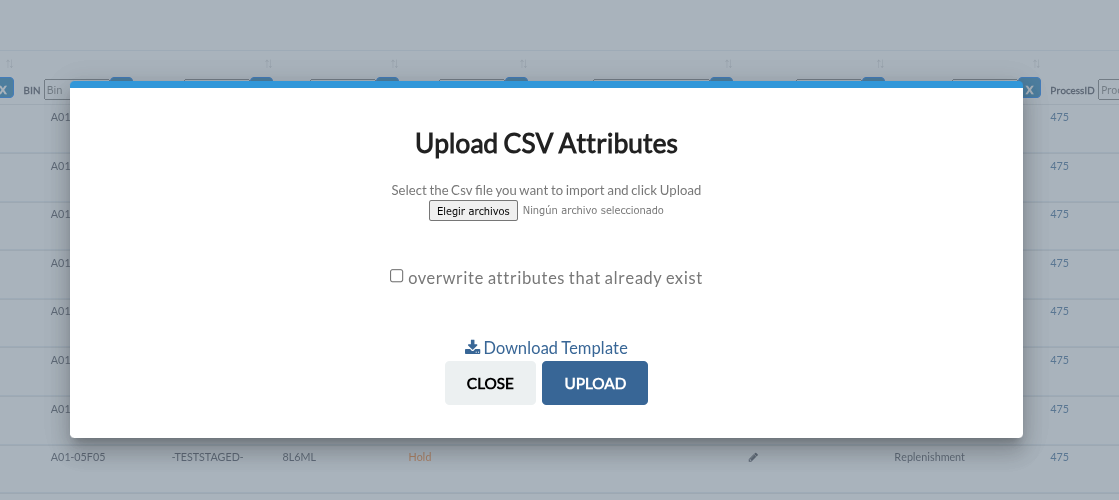
In the header row, open Actions and click Add Attributes By CSV.
Template and overwrite
In the popup, click Download Template. If you need to replace existing attribute data, use the overwrite option in the dialog when your site shows it.
Fill the file
Enter SKU, Serial, attribute name, and attribute value. You can add several rows for the same serial (multiple attributes) or for different serials.
Upload
Return to the popup, upload the file, and complete the upload action. The system shows a confirmation when attributes are applied.

Find the serial and open history
Use search or column filters to find the serial. In the row, use the expand control in the first column after the checkboxes plus (+) icon to open the child row.
Review SERIAL HISTORY
The panel lists processes the serial has gone through, such as Order, Replenishment, Return, Recount, and Move. It shows SERIAL HISTORY with columns: SKU, ProdID, BIN, Serial, Status, WMS Notes, OMS Notes, ProcessType, ProcessID, Order#, Update.
METADATA
When the serial has attributes, a METADATA table lists Attribute and Value pairs.
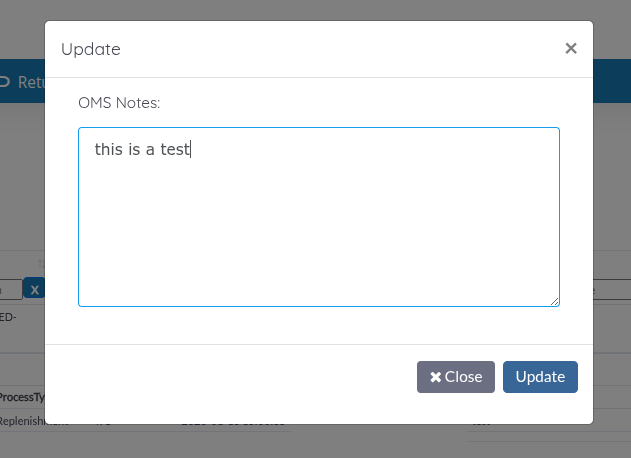
Click the pencil next to OMS Notes
In the OMS Notes column, click the pencil icon on the row you want to edit.
Update the modal
The modal title is Update. The form label is OMS Notes:. Edit the text and click Update. On failure, you may see Please try again..
See SKU, ProdID, bin, location, serial value, status, WMS and OMS notes, process type, process ID, order number, and last update in a single sortable table.
Expand a row for SERIAL HISTORY and optional METADATA, or download CSV history for selected serials—including attribute columns when present.
Edit OMS Notes from the grid, open Attributes per row or in bulk, or import attributes from CSV using the Actions menu.
Narrow the list with column filters or the global search before selecting rows for Add Attributes or Download Serial History so you export only what you need.
Use OMS Notes to share context with your warehouse without changing WMS Notes.
Download the template from the CSV dialog, match the expected format, and decide whether to overwrite existing attributes before uploading.
| Problem | What to try |
|---|---|
| Page is blank below the header | Confirm you are on an OMS Account. The serials table is only rendered for that level. |
| You must check at least one | Select at least one row checkbox before Download Serial History. |
| Please try again.. after saving OMS Notes | Save again; if it persists, contact support (server update may have failed). |
| error processing csv file | Confirm the file format and that you chose a valid CSV; try a smaller file. |
| Attribute CSV upload succeeds | A short Success dialog appears (then closes). |
Next steps: Product attributes · Metadata management · Catalog overview